
AmiTCP 4.2 Setup – SLIP connection
A1200 Side
Install AmiTCP 4.2, run the configuration and make sure you create a login (usually does that automatically and asks you for a new password).
A quick guide to a part of the initial installation/config should go like this:
Proceed into the Installation
Note: On initial Installations it may first prompt you to create a username/login and ask you to set a password. Just follow the onscreen instructions for that.
- Select: Normal Configuation
- Select: SLIP/CSLIP
- Select: rhslip
- Enter the IP: 192.168.0.1
- Enter Netmask: 255.255.255.0
- Correct? Select: Yes
- Select: serial.device
- Unit: 0
- Baud: 38400
- MTU: 1006
- Disable (uncheck) EOF and Hardware Handshaking
- Correct? Select: Yes
- Enter Default Gateway: 192.168.0.2
- Enter Hostname: A1200
- Enter Domain: pokelan.nl
- Enter Aliases: Skip by hitting the proceed button
- Serv/Inetd programs? Select: Yes
- Done
On the A1200, we don’t actually specify any Ethernet device in the config, thats because we are going to plumb in the cnet device later on…manually!
A500+ Side
- Proceed into the Installation
- On initial Installations it may first prompt you to create a username/login and ask you to set a password. Just follow the onscreen instructions for that.
- The configuration process – Select:
- Select: Normal Configuation
- Select: SLIP/CSLIP
- Select: rhslip
- Enter the IP: 192.168.0.2
- Enter Netmask: 255.255.255.0
- Correct? Select: Yes
- Select: serial.device
- Unit: 0
- Baud: 38400
- MTU: 1006
- Disable (uncheck) EOF and Hardware Handshaking
- Correct? Select: Yes
- Enter Default Gateway: 192.168.0.1
- Enter Hostname: A500
- Enter Domain: pokelan.nl
- Enter Aliases: Skip by hitting the proceed button
- Serv/Inetd programs? Select: Yes
- Done.
AmiTCP/CNet.device & Routing Setup
The A1200 Side
Edit the configurations to reflect the settings below AFTER you have done the install. The reason being is that there are important files copied and password files setup during install which may overwrite the files we want to change…
First, you will need to download Cnet.device (from Aminet) and copy it into your DEVS:Networks/ directory.
Below are a list of files which will need editing to configure the system, although most of them will be ready-to-go from the initial installation, it is wise to read through them ALL and edit when necessary.
AmiTCP.config
#
# $Id: AmiTCP.config,v 4.3 1994/10/02 23:06:51 jraja Exp $
#
# AmiTCP/IP configuration file. See documentation for usage.
#
# Copyright © 1994 AmiTCP/IP Group,
#                  Network Solutions Development Inc.
#                  All rights reserved.
#
# It is extremely important that you set gateway=YES otherwise your SLIP ain't
# gonna be talking to your cnet.device!
useloopback=YES
debugsana=NO
usens=SECOND
gateway=YES
rhslip0.config
# $Id: rhslip0.config,v 1.1 1993/08/17 00:00:00 rhialto Exp $
#
# This file is the configuration file for the SANA-II SLIP
# driver.  It only contains one config line (aside from
# the comments).  The format of the line (in ReadArgs()
# style) is:
#
# SERNAME/A,SERUNIT/A/N,SERBAUD/A/N,IPSTR/A,CD=CARRIERDETECT/S,7WIRE/S
#
# SERNAME - The name of the serial device to use.
#
# SERUNIT - The unit number for the serial device.
#
# SERBAUD - The baud rate to use with the serial device.
#
# IPSTR    - The IP address of the SLIP Device
#
# CD=CARRIERDETECT - If specified, causes the slip.device to pay attention
#                    to the status of the carrier detect line.  If this isn't
#          specified, slip.device ignores the CD signal.
#
# 7WIRE   - If specified, causes slip.device to use seven wire handshaking
#      with the modem (strongly recommended for high baud rates).
#
# This is the file which tells rhslip.device which serial driver to use.
# in our case, this is serial.device.
# Those smart alecs out there who may try and use the BaudBandit.device to increase
# the byte thruput may be dissapointed as I couldnt get it to work... Let me know if you
# manage.
# One IMPORTANT point worth mentioning is this file should reside in:
# ENVARC:Sana2/rhslip0.config
# The ENVARC: is available via CLI as ENVARC: or in SYS:Prefs/Env-Archive
#
# The IP address 1.1.1.2 is just any IP, since its on both ends of the slip i'm
# not too sure about it's importance as it hasn't affected operations.
# (Whether it really interferes with the real 1.1.1.0 network is something i dont know)
# Just leave it like this for the time being!
serial.device 0 38400 1.1.1.2
startnet
.key IP,HN/K,DEST/K,MASK/K,GW/K,USER/K,SRV/S,BOOTP/S,UMASK/K,S2CF/K,S2OPT/K,IFACE/K,DEBUG/S
.bra {
.ket }
;
; This file is the startnet which resides in AmiTCP:bin/startnet
; This is for the Amiga doing the SLIP-Ethernet routing. In my
; case it is the A1200. This is almost identical to the A500's SLIP setup, except for the
; swapped around IP address and default gateway address. There is no Ethernet setup in this file.
; that is all sorted out in the user-startnet and interfaces files.
;
; Set the IP address of the slip0 interface as shown:
.def IP    192.168.0.1
;
; Give your machine a name! Even if you don't have a domain, you must specify a dummy one.
; in my case I chose pokelan.nl ;P
.def HN    "a1200.pokelan.nl"
;
; Leave the DEST parameter empty...
.def DEST
;
; Set your netmask to this:
.def MASK  255.255.255.0
; IP address of the default gateway - Since you are setting this machine as a SLIP connection
; the only other destination you can have is the machine at the other end! in my case this
; will be my A1200's SLIP IP.
.def GW    192.168.0.2
;
; Default login name - Set this to something you set up in the AmiTCP passwd file...
; Its a good idea to use the AmiTCP Installer tool to add a userid before you edit
; this file...
.def USER  red
;
; User's file creation mask - Set this to 022
.def UMASK 022
;
; "SRV" if servers are used. Set it to SRV for now.
.def SRV   SRV
;
; "BOOTP" if bootstrap protocol is used, since it's now - just leave it blank.
.def BOOTP
;
; Interface name - VERY important that you get this identical to the one in the
; AmiTCP:db/interfaces file. Since I have provided that config you might aswell leave
; this set to slip0
.def IFACE slip0
;
; Sana-II device configuration file - Well this is strange, it could be a big but its not...
; you see, even if you define slip0.config here, since we are using rhslip.device it will
; automatically check for rhslip0.config in the ENVARC:Sana2/, so leave this the same as below
; as it is obviously counteracted by rhslip.device
;
.def S2CF  slip0.config
;
; Sana-II device configuration to be stored into the configuration file
; It is weird that this line is here at all! The line below is basically what is contained
; in the ENVARC:Sana2/rhslip0.config file. You can leave this line alone if you wish -
; its not used, I commented it out.
;.def S2OPT "serial.device 0 38400 0.0.0.0 MTU=1006 "
;
; *NOTE*  YOU SHOULD NOT NEED TO EDIT ANYTHING BELOW. IF YOU NEED TO ADD
; *NOTE*  CONFIGURATIONS OF ADDITIONAL INTERFACES OR TO START UTILITIES,
; *NOTE*  DO IT IN THE AmiTCP:db/User-Startnet.
;
; Set the failat level so that the errors can be handled by the script
FailAt 21
; Log in
echo
echo login: {USER}
AmiTCP:bin/login -f {USER}
AmiTCP:bin/umask {UMASK}
run AmiTCP:AmiTCP {DEBUG}
WaitForPort AMITCP
If NOT Warn
  ; Create Sana2 configuration file if used
  If NOT X EQ "X{S2CF}"
    ; Assure that ENV:Sana2 exists
    If NOT Exists ENV:Sana2
      MakeDir ENV:Sana2
    EndIf
    ; Create configuration file
    Echo "{S2OPT}" >ENV:Sana2/{S2CF}
  EndIf
  ; Do we need loopback?
  If X EQ "X{SRV}"
    Set LOOPBACK=""
  Else
    Set LOOPBACK="LOOPBACK"
  EndIf
  ; Configure interface
  AmiTCP:bin/bootpconfig {IFACE} IP {IP$*} DEST {DEST$*} MASK {MASK$*} GW {GW$*} $LOOPBACK {BOOTP} {DEBUG}
  If NOT Warn
    If NOT X EQ "X{HN}"
      rx "address AMITCP; 'ADD HOST {IP} {HN}'"
    Else
      If NOT X EQ "X{DEBUG}"
        echo "Quering Name Server for the host name..."
      EndIf
    EndIf
    setenv HOSTNAME `AmiTCP:bin/hostname`
    Assign TCP: Exists >NIL:
    IF Warn
      Mount TCP: from AmiTCP:devs/Inet-Mountlist
    EndIf
    ; Start the internet `super server' if wanted
    If NOT X EQ "X{SRV}"
      If X EQ "X{DEBUG}"
        Run <NIL: >NIL: AmiTCP:bin/inetd
      Else
        Run AmiTCP:bin/inetd {DEBUG}
      EndIf
    EndIf
    ;
    ; Configure any additional interfaces & start utilities in
    ; AmiTCP:db/User-Startnet
    ;
    If Exists AmiTCP:db/User-Startnet
      Execute AmiTCP:db/User-Startnet
    EndIf
  Else
    Echo Interface {IFACE} configuration failed!
    Echo Stopping AmiTCP
    AmiTCP:bin/stopnet FLUSH
  EndIf
Else
  Echo AmiTCP couldn't be started!
EndIf
; EOF
user-startnet
# Ok, the machine you have in the middle of your SLIP and Ethernet device needs to know
# how to get out to the internet. Well. In my case (and in this example's case) the Internet
# Is reachable via a NAT device. A NAT is Explained in the main document, but for clarity it is
# a device which will route your internal network to the outside world, but all connections will
# maquearade as the NAT box's external IP address. Hard to figure? Hmm....
# Look for Network Address Translation on the Internet.
#
# Right, First off, lets tell the ethernet card to assume an identity...
# Give it an IP address with the following ifconfig line:
#
AmiTCP:bin/ifconfig cnet 10.0.0.100 netmask 255.255.255.0 broadcast
10.0.0.255
#
# Now we have that up, we need to tell AmiTCP to send packets to a different Default gateway
# than it wants to... We do this by first DELETING the default route (which is currently
# Assigned to the slip0 device).
#
amitcp:bin/route delete default
#
# Next we tell AmiTCP on which interface to find our NAT box... the NAT box is on the 10.1.0.0
# network, and need to route though the 10.1.0.100 interface.
#
amitcp:bin/route add -host 10.0.0.1 -interface 10.0.0.100
#
#
# Last but not at all least, we need to add a new default route so that all packets not destined
# for the 192.168.1.0 network are routed to the NAT box via the 10.0.0.100 gateway
# Routing can take a while to get the grasp of (it took me a week to get this entire configuration/
# working!) but it will eventually become easier when you know what things go where and why.
#
amitcp:bin/route add default -host 10.0.0.1
resolv.conf
; Domain names
; Simply specify your domain name (can be a dummy fake one like the one I used since
; I don't have a domain of my own, perhaps its useful to use your ISP's domain name).
;
DOMAIN pokelan.nl
; Enter a list of domain name servers you have access to. The ones You should really consider
; using are the nameservers provided by your ISP. This is necessary in order for your computer
; to be able to resolve hostnames to ip addresses and visa versa.
;
NAMESERVER 212.120.66.204
NAMESERVER 213.239.156.250
NAMESERVER 213.239.150.250
;
; This file should reside in AmiTCP:db/resolv.conf
interfaces
# This is the interfaces file which resides in AmiTCP:db/
# You must note that this is the interfaces file for the Amiga on the
# SLIP and Ethernet gateway side, im my case - the A1200
# Below defines the slip0 alias to reference the rhslip.device and sent parameters to it.
#
slip0 DEV=DEVS:Networks/rhslip.device UNIT=0
# IPTYPE=2048 NOARP P2P IPREQ=8 WRITEREQ=8 <- this bit is commented out, so unused.
#
# The next very important line, and in fact is the only difference between the A500 and A1200's
# configuration in this example...
# The line below will not exist in your prefabricated interfaces file from the AmiTCP setup,
# so you will need to add it yourself...
cnet DEV=devs:networks/cnet.device
# Make sure you copied the cnet.device into the DEVS:Networks/ directory.
# If you dont have the file, download it off Aminet!
#
# The rest of the file can be ignored....
#
# SLIP with Van Jacobson header compression
#
cslip0 DEV=DEVS:Networks/rhcslip.device UNIT=0
# IPTYPE=2048 NOARP P2P IPREQ=8 WRITEREQ=8
#
# PPP device by Holger Kruse
#
ppp0 DEV=DEVS:Networks/ppp.device UNIT=0 IPTYPE=33 NOARP P2P IPREQ=8 WRITEREQ=8
#
# Ethernet adapter A2065
#
ether0 DEV=DEVS:Networks/a2065.device UNIT=0
a2065 DEV=DEVS:Networks/a2065.device UNIT=0
# IPTYPE=2048 ARPTYPE=2054 ARPREQ=4 IPREQ=16 WRITEREQ=16
#
# AmeriStar A4066 Ethernet adapter
#
a4066 DEV=DEVS:Networks/a4066.device UNIT=0
#
# Hydra Ethernet adapter
#
hydra DEV=DEVS:Networks/hydra.device UNIT=0
#
# GoldenGate WD80xx Ethernet adapter
#
wd80xx DEV=DEVS:Networks/wd80xx.device UNIT=0
# NOTE: This needs an configuration file for the IRQ and MEM address settings!
#
# ASDG EB920 Ethernet adapter
#
eb920 DEV=DEVS:Networks/eb920.device UNIT=0
#
# Village Tronic Ariadne Ethernet adapter
#
ariadne DEV=DEVS:Networks/ariadne.device UNIT=0
#
# QuickNet Ethernet adapter
#
quicknet DEV=QuickNetS2.device UNIT=0 NOQUICKIO
#
# GoldenGate 2 Ethernet for 3COM 3c503 card
# NOTE: This needs an configuration file for the IRQ and ISA address settings!
#
gg_3c503 DEV=DEVS:Networks/gg_3c503.device UNIT=0
#
# GoldenGate 2 Ethernet for NE1000 card
# NOTE: This needs an configuration file for the IRQ and ISA address settings!
#
gg_ne1000 DEV=DEVS:Networks/gg_ne1000.device UNIT=0
#
# GoldenGate 2 Ethernet for NE2000 card
# NOTE: This needs an configuration file for the IRQ and ISA address settings!
#
gg_ne2000 DEV=DEVS:Networks/gg_ne2000.device UNIT=0
#
# GoldenGate 2 Ethernet for SMC/WD 80x3 card
# NOTE: This needs an configuration file for the IRQ,
# IO and BASE address settings!
#
gg_smc DEV=DEVS:Networks/gg_smc.device UNIT=0
#
# Arcnet adapter a2060
#
arcnet0 DEV=DEVS:Networks/a2060.device UNIT=0 NOTRACKING
a2060 DEV=DEVS:Networks/a2060.device UNIT=0 NOTRACKING
# IPTYPE=240 ARPTYPE=241 ARPREQ=4 IPREQ=16 WRITEREQ=16
#
# An X.25 driver by Dave Martin
#
ax25 DEV=DEVS:Networks/ax25.device UNIT=0 +
  IPTYPE=204 ARPTYPE=205 ARPREQ=3 IPREQ=16 WRITEREQ=16
#
# PLIP (Parallel Line IP)
#
plip0 DEV=DEVS:Networks/plip.device UNIT=0 +
  IPTYPE=2048 NOARP P2P IPREQ=8 WRITEREQ=8
plip1 DEV=DEVS:Networks/plip.device UNIT=1 +
  IPTYPE=2048 NOARP P2P IPREQ=8 WRITEREQ=8
#
# Liana (PLIP) interface
#
liana0 DEV=DEVS:Networks/liana.device UNIT=0 +
  IPTYPE=2048 NOARP P2P IPREQ=8 WRITEREQ=8
liana1 DEV=DEVS:Networks/liana.device UNIT=1 +
  IPTYPE=2048 NOARP P2P IPREQ=8 WRITEREQ=8
#
# Village Tronic Ariadne Liana (PLIP) interface
#
ariadneliana0 DEV=DEVS:Networks/ariadneliana.device UNIT=0 +
  IPTYPE=2048 NOARP P2P IPREQ=8 WRITEREQ=8
ariadneliana1 DEV=DEVS:Networks/ariadneliana.device UNIT=1 +
  IPTYPE=2048 NOARP P2P IPREQ=8 WRITEREQ=8
#
# EOF
The A500 Side
AmiTCP.config
#
# $Id: AmiTCP.config,v 4.3 1994/10/02 23:06:51 jraja Exp $
#
# AmiTCP/IP configuration file. See documentation for usage.
#
# Copyright © 1994 AmiTCP/IP Group,
#                  Network Solutions Development Inc.
#                  All rights reserved.
# The config file from the Amiga 500+. This resides in AmiTCP:db/
# Remember, the A500 in this case is the one on the end of the slip connection
# Therefore does not need to be a Gateway.
#
useloopback=YES
debugsana=NO
usens=SECOND
gateway=NO
inetd.conf
# This is the inetd.config file which resided in AmiTCP:db/inetd.conf
# This file should only be edited if you intend to run the Webserver
# All there is is 1 extra line added. Scroll all the way to the bottom
# to see it...
# PLEASE NOTE: That this inetd.config line is SPECIFIC to the webserver
#              used, the webserver I use in this example is the webserver.rexx
#
#  $Id: inetd.conf,v 4.5 1994/12/11 09:02:43 ppessi Exp $
#
#  The inetd configuration file.
#
#  Copyright © 1994 AmiTCP/IP Group,
#                   Network Solutions Development Inc.
#                   All rights reserved.
#
# Inetd reads its configuration information from this file upon
# execution and at some later time if this file is changed or inetd
# is reconfigured in response with a CTRL-F signal.
#
##
#
# Configuration lines are parsed with DOS function ReadItem().
# Multiple line entries must have a ``+'' char as the last char in the
# line. First 6 fields must be present in each entry. The line has
# following entries in this order:
#
# service socket-type protocol wait user server cli-name cli-arguments
#
##
#       inetd internal services
##
#
daytime   stream      tcp nowait root internal
daytime   dgram       udp nowait root internal
time      stream      tcp nowait root internal
time      dgram       udp nowait root internal
echo      stream      tcp nowait root internal
echo      dgram       udp nowait root internal
discard   stream      tcp nowait root internal
discard   dgram       udp nowait root internal
chargen   stream      tcp nowait root internal
chargen   dgram       udp nowait root internal
# An experimental finger server
finger    stream tcp nowait nobody amitcp:serv/in.fingerd -in.fingerd s:.plan
# NetFS, a networking support between Amigas
# Remove # from the next line to enable NetFS
#amiganetfs stream    tcp nowait root amitcp:serv/netfs-server
#
# net/2 ftp daemon ported by Magnus Lilja
#
ftp       stream      tcp nowait root AmiTCP:serv/ftpd ftpd -l -x
#
# Naive servers
whois     stream tcp dos bin - echo The whois service is not installed
telnet    stream tcp dos bin - echo The telnet service is not installed
quote     stream tcp dos bin - echo "I'm not in a smart mood today."
#
# The inetd line for the webserver:
arws      stream tcp dos bin - rx amitcp:serv/webserver.rexx
# MAKE ABSOLUTLY SURE that the Rexxc directory on your system disk can be located.
# To be sure, add a path in the S:User-startup file
# e.g:
# path Workbench:Rexxc add
# The reason for this is becuase the Arexx command rx needs to be called.
interfaces
# This is the interfaces file which resides in AmiTCP:db/
# You must note that this is the interfaces file for the Amiga on the
# end of the SLIP connection, im my case - the A500+
# Below defines the slip0 alias to reference the rhslip.device and sent parameters to it.
#
slip0 DEV=DEVS:Networks/rhslip.device UNIT=0
# IPTYPE=2048 NOARP P2P IPREQ=8 WRITEREQ=8 <- this bit is commented out, so unused.
#
# The rest of the file can be ignored...
#
# SLIP with Van Jacobson header compression
#
cslip0 DEV=DEVS:Networks/rhcslip.device UNIT=0
# IPTYPE=2048 NOARP P2P IPREQ=8 WRITEREQ=8
#
# PPP device by Holger Kruse
#
ppp0 DEV=DEVS:Networks/ppp.device UNIT=0 IPTYPE=33 NOARP P2P IPREQ=8 WRITEREQ=8
#
# Ethernet adapter A2065
#
ether0 DEV=DEVS:Networks/a2065.device UNIT=0
a2065 DEV=DEVS:Networks/a2065.device UNIT=0
# IPTYPE=2048 ARPTYPE=2054 ARPREQ=4 IPREQ=16 WRITEREQ=16
#
# AmeriStar A4066 Ethernet adapter
#
a4066 DEV=DEVS:Networks/a4066.device UNIT=0
#
# Hydra Ethernet adapter
#
hydra DEV=DEVS:Networks/hydra.device UNIT=0
#
# GoldenGate WD80xx Ethernet adapter
#
wd80xx DEV=DEVS:Networks/wd80xx.device UNIT=0
# NOTE: This needs an configuration file for the IRQ and MEM address settings!
#
# ASDG EB920 Ethernet adapter
#
eb920 DEV=DEVS:Networks/eb920.device UNIT=0
#
# Village Tronic Ariadne Ethernet adapter
#
ariadne DEV=DEVS:Networks/ariadne.device UNIT=0
#
# QuickNet Ethernet adapter
#
quicknet DEV=QuickNetS2.device UNIT=0 NOQUICKIO
#
# GoldenGate 2 Ethernet for 3COM 3c503 card
# NOTE: This needs an configuration file for the IRQ and ISA address settings!
#
gg_3c503 DEV=DEVS:Networks/gg_3c503.device UNIT=0
#
# GoldenGate 2 Ethernet for NE1000 card
# NOTE: This needs an configuration file for the IRQ and ISA address settings!
#
gg_ne1000 DEV=DEVS:Networks/gg_ne1000.device UNIT=0
#
# GoldenGate 2 Ethernet for NE2000 card
# NOTE: This needs an configuration file for the IRQ and ISA address settings!
#
gg_ne2000 DEV=DEVS:Networks/gg_ne2000.device UNIT=0
#
# GoldenGate 2 Ethernet for SMC/WD 80x3 card
# NOTE: This needs an configuration file for the IRQ,
# IO and BASE address settings!
#
gg_smc DEV=DEVS:Networks/gg_smc.device UNIT=0
#
# Arcnet adapter a2060
#
arcnet0 DEV=DEVS:Networks/a2060.device UNIT=0 NOTRACKING
a2060 DEV=DEVS:Networks/a2060.device UNIT=0 NOTRACKING
# IPTYPE=240 ARPTYPE=241 ARPREQ=4 IPREQ=16 WRITEREQ=16
#
# An X.25 driver by Dave Martin
#
ax25 DEV=DEVS:Networks/ax25.device UNIT=0 +
  IPTYPE=204 ARPTYPE=205 ARPREQ=3 IPREQ=16 WRITEREQ=16
#
# PLIP (Parallel Line IP)
#
plip0 DEV=DEVS:Networks/plip.device UNIT=0 +
  IPTYPE=2048 NOARP P2P IPREQ=8 WRITEREQ=8
plip1 DEV=DEVS:Networks/plip.device UNIT=1 +
  IPTYPE=2048 NOARP P2P IPREQ=8 WRITEREQ=8
#
# Liana (PLIP) interface
#
liana0 DEV=DEVS:Networks/liana.device UNIT=0 +
  IPTYPE=2048 NOARP P2P IPREQ=8 WRITEREQ=8
liana1 DEV=DEVS:Networks/liana.device UNIT=1 +
  IPTYPE=2048 NOARP P2P IPREQ=8 WRITEREQ=8
#
# Village Tronic Ariadne Liana (PLIP) interface
#
ariadneliana0 DEV=DEVS:Networks/ariadneliana.device UNIT=0 +
  IPTYPE=2048 NOARP P2P IPREQ=8 WRITEREQ=8
ariadneliana1 DEV=DEVS:Networks/ariadneliana.device UNIT=1 +
  IPTYPE=2048 NOARP P2P IPREQ=8 WRITEREQ=8
#
# EOF
resolv.conf
; Domain names
; Simply specify your domain name (can be a dummy fake one like the one I used since
; I don't have a domain of my own, perhaps its useful to use your ISP's domain name).
;
DOMAIN pokelan.nl
; Enter a list of domain name servers you have access to. The ones You should really consider
; using are the nameservers provided by your ISP. This is necessary in order for your computer
; to be able to resolve hostnames to ip addresses and visa versa.
;
NAMESERVER 212.120.66.204
NAMESERVER 213.239.156.250
NAMESERVER 213.239.150.250
;
; This file should reside in AmiTCP:db/resolv.conf
rhslip0.config
# $Id: rhslip0.config,v 1.1 1993/08/17 00:00:00 rhialto Exp $
#
# This file is the configuration file for the SANA-II SLIP
# driver.  It only contains one config line (aside from
# the comments).  The format of the line (in ReadArgs()
# style) is:
#
# SERNAME/A,SERUNIT/A/N,SERBAUD/A/N,IPSTR/A,CD=CARRIERDETECT/S,7WIRE/S
#
# SERNAME - The name of the serial device to use.
#
# SERUNIT - The unit number for the serial device.
#
# SERBAUD - The baud rate to use with the serial device.
#
# IPSTR    - The IP address of the SLIP Device
#
# CD=CARRIERDETECT - If specified, causes the slip.device to pay attention
#                    to the status of the carrier detect line.  If this isn't
#          specified, slip.device ignores the CD signal.
#
# 7WIRE   - If specified, causes slip.device to use seven wire handshaking
#      with the modem (strongly recommended for high baud rates).
#
# This is the file which tells rhslip.device which serial driver to use.
# in our case, this is serial.device.
# Those smart alecs out there who may try and use the BaudBandit.device to increase
# the byte thruput may be dissapointed as I couldnt get it to work... Let me know if you
# manage.
# One IMPORTANT point worth mentioning is this file should reside in:
# ENVARC:Sana2/rhslip0.config
# The ENVARC: is available via CLI as ENVARC: or in SYS:Prefs/Env-Archive
#
# The IP address 1.1.1.2 is just any IP, since its on both ends of the slip i'm
# not too sure about it's importance as it hasn't affected operations.
# (Whether it really interferes with the real 1.1.1.0 network is something i dont know)
# Just leave it like this for the time being!
serial.device 0 38400 1.1.1.2
services
# This file should only be edited if you are intending to run the webserver in the
# example inetd.conf
# The only line you need to add in this case is:
#
http     80/tcp      arws
#
# I must stress that it is usually very specific to the Http daemon you want to use
# that defines what goes in here... in my example the A500+ is running the arws webserver.rexx
#
#
#
#
#  $Id: services,v 4.6 1995/01/18 00:28:27 too Exp $
#
#  The services database file for AmiTCP/IP.
#
#  Copyright © 1994 AmiTCP/IP Group,
#                   Network Solutions Development Inc.
#                   All rights reserved.
#
echo     7/tcp
echo     7/udp
discard     9/tcp    sink null
discard     9/udp    sink null
systat      11/tcp      users
daytime     13/tcp
daytime     13/udp
netstat     15/tcp
qotd     17/tcp      quote
chargen     19/tcp      ttytst source
chargen     19/udp      ttytst source
ftp      21/tcp
telnet      23/tcp
smtp     25/tcp      mail
time     37/tcp      timserver
time     37/udp      timserver
rlp      39/udp      resource ; resource location
nameserver  42/tcp      name     ; IEN 116
whois    43/tcp      nicname
domain      53/tcp      nameserver  ; name-domain server
domain      53/udp      nameserver
mtp      57/tcp            ; deprecated
;; `bootp' is included here for historical reasons
bootps      67/udp      bootp    ; bootstrap protocol server
bootpc      68/udp            ; bootstrap protocol client
tftp     69/udp
gopher      70/tcp
rje      77/tcp      netrjs
finger      79/tcp
link     87/tcp      ttylink
supdup      95/tcp
hostnames   101/tcp     hostname ; usually from sri-nic
csnet-ns 105/tcp
pop      109/tcp     postoffice pop2
pop3            110/tcp             ; postoffice v3
sunrpc      111/tcp
sunrpc      111/udp
auth     113/tcp     authentication
sftp     115/tcp
uucp-path   117/tcp
nntp     119/tcp     readnews untp  ; USENET News Transfer Protocol
ntp      123/udp
netbios-ns  137/udp
netbios-dgm    138/udp
netbios-ssn    139/tcp
swat     901/tcp
print-srv   170/tcp           ; network PostScript
;
; UNIX specific services
;
exec     512/tcp
biff     512/udp     comsat
login    513/tcp
who      513/udp     whod
shell    514/tcp     cmd      ; no passwords used
syslog      514/udp
printer     515/tcp     spooler     ; line printer spooler
talk     517/udp
ntalk    518/udp
efs      520/tcp           ; for LucasFilm
route    520/udp     router routed
timed    525/udp     timeserver
tempo    526/tcp     newdate
courier     530/tcp     rpc
conference  531/tcp     chat
netnews     532/tcp     readnews
netwall     533/udp           ; -for emergency broadcasts
uucp     540/tcp     uucpd    ; uucp daemon
remotefs 556/tcp     rfs_server rfs ; Brunhoff remote filesystem
rmonitor 560/udp     rmonitord
monitor     561/udp
elcsd    704/ucp           ; errlog
ingreslock  1524/tcp
;
; Amiga specific services
;
amiganetfs      2500/tcp
;
###
## Emacs magic:
## Local Variables: **
## backup-by-copying:t **
## End: **
###
startnet
.key IP,HN/K,DEST/K,MASK/K,GW/K,USER/K,SRV/S,BOOTP/S,UMASK/K,S2CF/K,S2OPT/K,IFACE/K,DEBUG/S
.bra {
.ket }
;
;
; Ok, first off - ignore all the greyed out text - it's not important/relevent to
; this setup...leave it untouched.
; This file is the startnet which resides in AmiTCP:bin/startnet
; This is for the Amiga on the end of the SLIP connection. In my
; case it is the A500+.
;
; Set the IP address of the slip0 interface as shown:
.def IP    192.168.0.2
;
; Give your machine a name! Even if you don't have a domain, you must specify a dummy one.
; in my case I chose pokelan.nl ;P
.def HN    "a500.pokelan.nl"
;
; Leave the DEST parameter empty...
.def DEST
;
; Set your netmask to this:
.def MASK  255.255.255.0
; IP address of the default gateway - Since you are setting this machine as a SLIP connection
; the only other destination you can have is the machine at the other end! in my case this
; will be my A1200's SLIP IP.
.def GW    192.168.0.1
;
; Default login name - Set this to something you set up in the AmiTCP passwd file...
; Its a good idea to use the AmiTCP Installer tool to add a userid before you edit
; this file...
.def USER  red
;
; User's file creation mask - Set this to 022
.def UMASK 022
;
; "SRV" if servers are used. Set it to SRV for now.
.def SRV   SRV
;
; "BOOTP" if bootstrap protocol is used, since it's now - just leave it blank.
.def BOOTP
;
; Interface name - VERY important that you get this identical to the one in the
; AmiTCP:db/interfaces file. Since I have provided that config you might aswell leave
; this set to slip0
.def IFACE slip0
;
; Sana-II device configuration file - Well this is strange, it could be a big but its not...
; you see, even if you define slip0.config here, since we are using rhslip.device it will
; automatically check for rhslip0.config in the ENVARC:Sana2/, so leave this the same as below
; as it is obviously counteracted by rhslip.device
;
.def S2CF  slip0.config
;
; Sana-II device configuration to be stored into the configuration file
; It is weird that this line is here at all! The line below is basically what is contained
; in the ENVARC:Sana2/rhslip0.config file. You can leave this line alone if you wish -
; its not used, I commented it out.
;.def S2OPT "serial.device 0 38400 0.0.0.0 MTU=1006 "
;
; *NOTE*  YOU SHOULD NOT NEED TO EDIT ANYTHING BELOW. IF YOU NEED TO ADD
; *NOTE*  CONFIGURATIONS OF ADDITIONAL INTERFACES OR TO START UTILITIES,
; *NOTE*  DO IT IN THE AmiTCP:db/User-Startnet.
;
; Set the failat level so that the errors can be handled by the script
FailAt 21
; Log in
echo
echo login: {USER}
AmiTCP:bin/login -f {USER}
AmiTCP:bin/umask {UMASK}
run AmiTCP:AmiTCP {DEBUG}
WaitForPort AMITCP
If NOT Warn
  ; Create Sana2 configuration file if used
  If NOT X EQ "X{S2CF}"
    ; Assure that ENV:Sana2 exists
    If NOT Exists ENV:Sana2
      MakeDir ENV:Sana2
    EndIf
    ; Create configuration file
    Echo "{S2OPT}" >ENV:Sana2/{S2CF}
  EndIf
  ; Do we need loopback?
  If X EQ "X{SRV}"
    Set LOOPBACK=""
  Else
    Set LOOPBACK="LOOPBACK"
  EndIf
  ; Configure interface
  AmiTCP:bin/bootpconfig {IFACE} IP {IP$*} DEST {DEST$*} MASK {MASK$*} GW {GW$*} $LOOPBACK {BOOTP} {DEBUG}
  If NOT Warn
    If NOT X EQ "X{HN}"
      rx "address AMITCP; 'ADD HOST {IP} {HN}'"
    Else
      If NOT X EQ "X{DEBUG}"
        echo "Quering Name Server for the host name..."
      EndIf
    EndIf
    setenv HOSTNAME `AmiTCP:bin/hostname`
    Assign TCP: Exists >NIL:
    IF Warn
      Mount TCP: from AmiTCP:devs/Inet-Mountlist
    EndIf
    ; Start the internet `super server' if wanted
    If NOT X EQ "X{SRV}"
      If X EQ "X{DEBUG}"
        Run <NIL: >NIL: AmiTCP:bin/inetd
      Else
        Run AmiTCP:bin/inetd {DEBUG}
      EndIf
    EndIf
    ;
    ; Configure any additional interfaces & start utilities in
    ; AmiTCP:db/User-Startnet
    ;
    If Exists AmiTCP:db/User-Startnet
      Execute AmiTCP:db/User-Startnet
    EndIf
  Else
    Echo Interface {IFACE} configuration failed!
    Echo Stopping AmiTCP
    AmiTCP:bin/stopnet FLUSH
  EndIf
Else
  Echo AmiTCP couldn't be started!
EndIf
; EOF
user-startnet
# This file is the little extra startup script that AmiTCP
# reads upon starting and executes after loading the main
# startnet script...
# The file should reside in AmiTCP:db/User-Startnet
#
# Ok, once now what we need to do is tell the routing deamon
# where to send packets... in this case (the A500) is on the
# end of the SLIP connection with only 1 destination possible
# We want to tell the packets to go via the routing machine
# (my A1200 in this case and the onto the main gateway machine
# (The sun box in my case).
#
# My A1200's IP address is:
# 192.168.1.1 so, we add a route that tell all network traffic
# (0.0.0.0) is to go via the HOST 192.168.1.1
amitcp:bin/route add -net 0.0.0.0 -host 192.168.0.1
#
# Ok, now the packet will end up at the A1200's SLIP end,
# but what now? the packets don't have a clue
# where to send the packet next, so you must add the IP
# address of your NAT (Network Address Translation) box
# in my case it is the Sun Sparcstation running on the IP
# 10.1.0.1
amitcp:bin/route add -host 10.0.0.1 -interface 192.168.0.1
#
webserver.rexx
Unzip and edit this file with a text editor and set a path to the directory where you will store your HTML files.
Take note that I have experienced problems serving binary/image files with this webserver, so stick to serving plain text/html for the moment.
A1200 Hardware Notes
You will of course need a PCMCIA Network card, BE careful when choosing one! Not all work!
Compatibility List
The following cards have been reported to work:
- OvisLink Ethernet
- Apollo RE450CT (A1200 & A600)
- National Amiga’s Apnet card (A1200 & A600)
- Xircom 33k6 modem+eth10/100mbit
- Netax1200
- Amiganet from Hydra Systems
- RPTI nv401 NE2k compatible
- CNet CN40BC
- Accton EN2216
- Surecom EP-427
- Micronet SP122, SP125
- Socket Communications model AAA-1001
- SureCom EP-527
- Grey Systems Ethernet Gold Card
- KingMax Technology NE2000 Compatible PCMCIA Card Version 4.1
- LanPro NE2000 compatible
- Dynalink L10C Combo Ethernet Adapter – this is the one I use!
- Linksys EC2T Combo PCMCIA Ethernet card
- TRENDnet TE210CT
- Argosy EN210BT
- PINE Ethernet
- LinkMate/Apollo RE450CT
- Fiberline FL-4680
- TARGET 100M fast Ethernet PC CARD
- Genius ME3000IISE, ME3000II BNC / RJ45 Ethernet adaptor
- Tamarack Microelectronics Ethernet PCMCIA card
The following cards do NOT work:
- 3com cards
- Megahertz cards
- Xircom cards (except Xircom 33k6 modem+eth10/100mbit ?)
- Accton EN2212
- ActionTec FastNet PE-200 (may work if inserted AFTER power-on)
- DLink DE-650, DE-660
- Kingmax EN10-T2 R01
- Combo LM5LT-10N Ethernet and Faxmodem PCMCIA card
- Grey Cell Systems 3400 ethernet 10 base T / v.34 fax modem card
WARNING: The A1200 requires a modification to be done to the Gayle chip before the reset line of the PCMCIA slot will work. Yes! This is a manufacturing bug!
A1200 PCMCIA Reset Fix
The A1200 PCMCIA-port has a bug which causes most PCMCIA-cards not to work after doing a hard reset (cold boot). For PCMCIA modems it is possible to remove the card and insert it again while the power is on. However, removing and re-inserting an ETHERNET card does not work with AmiTCP, as AmiTCP tests via a software check for a card reset!
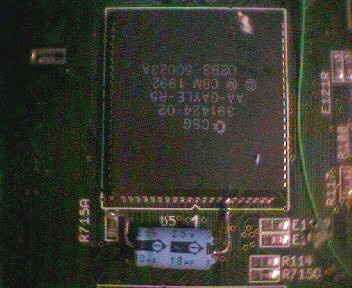
So, as we gathered – the A1200 does not generate a reset-signal for the PCMCIA port. The problem is “easily” solved by soldering a 10uF capacitor between CC_RESET and and Vcc pins on the Gayle chip. The type of capacitor required is the polarised electrolyte type.
The cathode (-) of the capacitor should be at CC_RESET. CC_RESET can be found on pin 5 of Gayle (U5) and Vcc on R715A (the end which is near Gayle).
A picture (from an external website) of such mod is here: Along with the webpage describing it HERE Sadly looks like that site is now gone. But here is the picture anyway:
Disclaimer
WARNING! Although this quite simple in theory – handling a soldering iron can be tricky – make sure you use a LOW wattage iron with a very fine tip, else you may end up de-soldering or shorting other pins on the chip. A useful tool to have handy when soldering is a solder sucker just in case you accidentally solder 2 pins together! If you are not up to doing this then please consult a professional. I take no responsibility for any damages caused by doing anything described in this howto!
N.A.T = Network Address Translation
Though by modern standards you can do this on your home router with ease, back when this how-to was written we were still using ISDN and home brew routers made from multi-interface Unix systems, in my case with a Sun Sparcstation with a Quad Fast Ethernet card behind a cable modem’s own firewall.
Below is for historical reference, you should be able to figure out how to port forward on your home router using many of the guides on the Internet.
You see references to NAT throughout the config files and wonder what it is? Well, simply put – The NAT box is essentially a router – the only difference is that it allows you to route your packets via a NAT box, the NAT box in turn converts your internal IP address to it’s own External IP, makes a record (called a keep state) in memory and then forwards your packet out onto the internet.
This means you can route via the NAT box with your internal LAN IPs.
A lot of DSL/cable routers feature a NAT function, however if you happen to have a spare Sun or Linux machine around, you can set up your own NAT quite easily. In this section I can explain briefly how to set up a NAT using the open source software IPfilter.
- Firstly, enable IP_FORWARDING using ndd in order to get your NAT box routing.
- Set up your NAT box to function as a router.
- Set up a route to tell the NAT box where to find your Amiga 500’s 192.168.x.x network…
REQUIREMENT: You must have a minimum of 2 interfaces. These can be 2 network cards (1 plugs into your LAN, the other a cable modem/DSL).
- Setting up NDD is something system specific, it’s best you read the IPfilter HOWTO that is available on the IPfilter website.
- On a Solaris box, simply having more than 1 interface makes the machine route. You will naturally have to edit the /etc/defaultrouter file to point to your ISP’s router. For Linux, I don’t know!
- In order for your NAT box to be able to reach the network on the other side of your A1200! (the A500)
route add -net 192.168.0.0 -host 10.0.0.100
Since the configuration setup of the Amigas in these documents reference a NAT box with the INTERNAL IP of 10.0.0.1, we shall use that in the following configuration example:
The internal interface (e.g hme0) is the LAN card connecting to your home computers (e.g. the Amiga 1200), and the external interface is the DSL/Cable modem to your ISP (e.g hme1).
First in ipf.conf
This is the rule file for the filtering, we don’t want filtering – so let just do this:
pass in on hme0 all
pass out on hme0 all
pass in on hme1 all
pass out on hme1 all
And the internal loopback interface:
pass in on lo0 all
pass out on lo0 all
Be VERY aware that this opens up your system as a router, when you get things working, check out the manual on how to filter your system!
Next edit ipnat.conf
This file will do the NAT mapping and redirection! (yep, a cool feature!)
Here’s an example:
# For letting Passive FTP work to the outside world…
map hme1 10.0.0.0/32 -> 0/32 portmap tcp/udp 40000:60000
map hme1 0/0 -> 0.0.0.0/32 proxy port ftp ftp/tcp

# This allows NAT to route packets destined for the Internet.
 map hme1 0.0.0.0/0 -> 0/32

# Next map the incoming port 904 map to port 80 of the Amiga500's address
 rdr le0 0.0.0.0/0 port 904 -> 192.168.0.2 port 80
Network Diagram
A Diagram of the network described in this document:
 Amiga 500+
 Running:
 AmiTCP 4.2
 |
 SLIP Serial Connection (about 3-4kbytes/s)
 |
 Amiga 1200
 Running AmiTCP 4.2
 with CNET Ethernet device
 |
 Ethernet LAN connection (about 1.5mbytes/s)
 |
 Sun SparcStation 5
 Running: A Firewall+NAT
 |
 Internet Service Provider via Cable modem
 |
 The Internet!

You must be logged in to post a comment.